Showing posts with label Amanda Herring. Show all posts

Friday, 26 May 2023

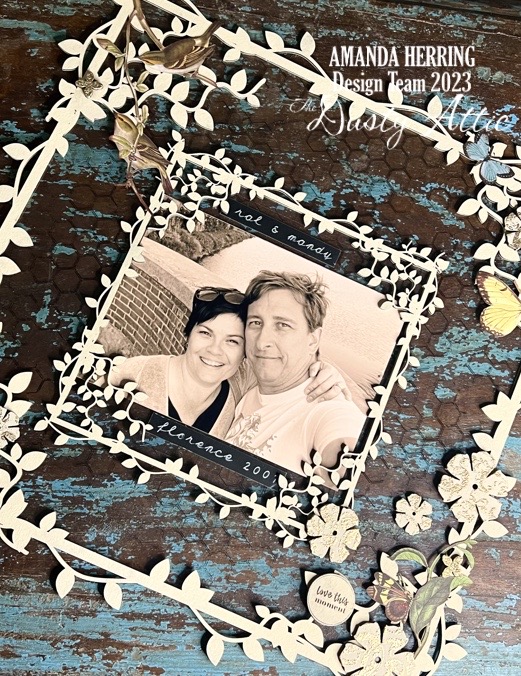
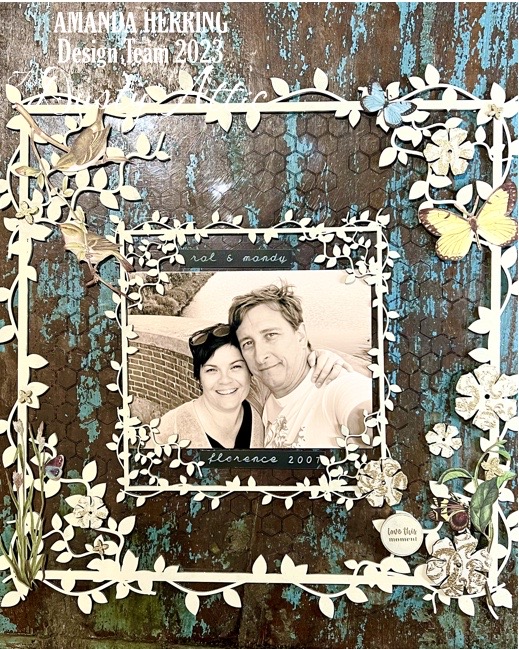
Love this moment - Amanda Herring


Hello 

I am back with another project for Dusty Attic 

I decided to make a decorative frame with a transparent background to showcase one of 

My favourite holiday pictures when I was in Florence.


It is a really simple piece but I love how it turned out, especially the transparent base. 
The clear acetate I used for my base has a distressed honeycomb design on it. 

To begin I have painted all my pieces of chipboard with cream acrylic paint. 
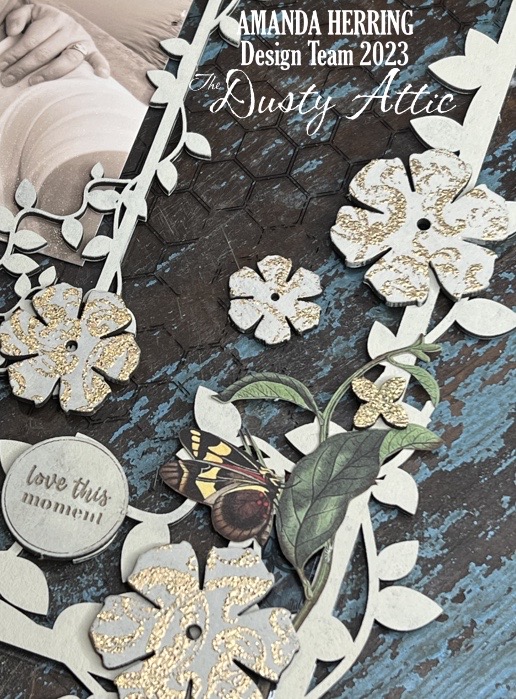
Once dry I have stamped and heat embossed the flowers with gold embossing powder 
for some extra texture.


Detail showing the embossing texture 


I think the really simple layout helps enhance the sepia toned photo, allowing it 
To remain  the main focus.


I have also added butterflies and leaf die cuts for a small pop of colour 


Supplies Used: 

DA0733 DeVine frame set
DACCo7R Garden Time Custom Mixed #7 
DA3321 Word Discs #3

49 & Market Meadow Laser Die cuts 
Stamperia Allegro acrylic paint Old Ivory 
Ranger embossing powder Gold Tinsel
Honeycomb Acetate sheet ( Kaiser Craft )


Thanks for stopping by 
Until next time 

Mandy x


Thursday, 11 May 2023

How long is forever ... Amanda Herring


Hi there 


I am back today to share another project with you,

 I have used my favourite photo of my parents 

when they were young to create a really simple panel.


I have used made a panel using a wooden panel as my base and chipboard designed by
 Antonis Tzanidakis.

I have covered the wooden panel with scrapbook paper from Stamperia and added 
some texture by stencilling a heavy body paste on top.


I have used aloe of various cogs and gears layered up to build texture on the two hearts from the 
unlock my heart chippy pack. 


Once all the layers are built up I have then painted the chippy with acrylic paints 
in the same colours of my background.


Details of all the layers


Supplies used; 

DA 0232 Jumbo cogs #1
DA 2370 Cogs #3
DA1932 Mini cogs #2
DA 2227L Unlock my heart
DA 2287 Time Travel Designer
DA2158 Metal Plates Stencil
DA1486 Glass Stains Stencil
Stamperia mixed media glue 
Stamperia primer
Stamperia acrylic paint Earth , Earth brown , Indian Turquoise and Albicocca
Golden Iridescent Copper and Quin Burnt Orange 


Thanks for stopping by to have a look

See you next time

Mandy x


Tuesday, 11 April 2023

Bamboo Desk Organiser - Mandy Herring


Hello

Today is my turn to share some creative inspiration with you.

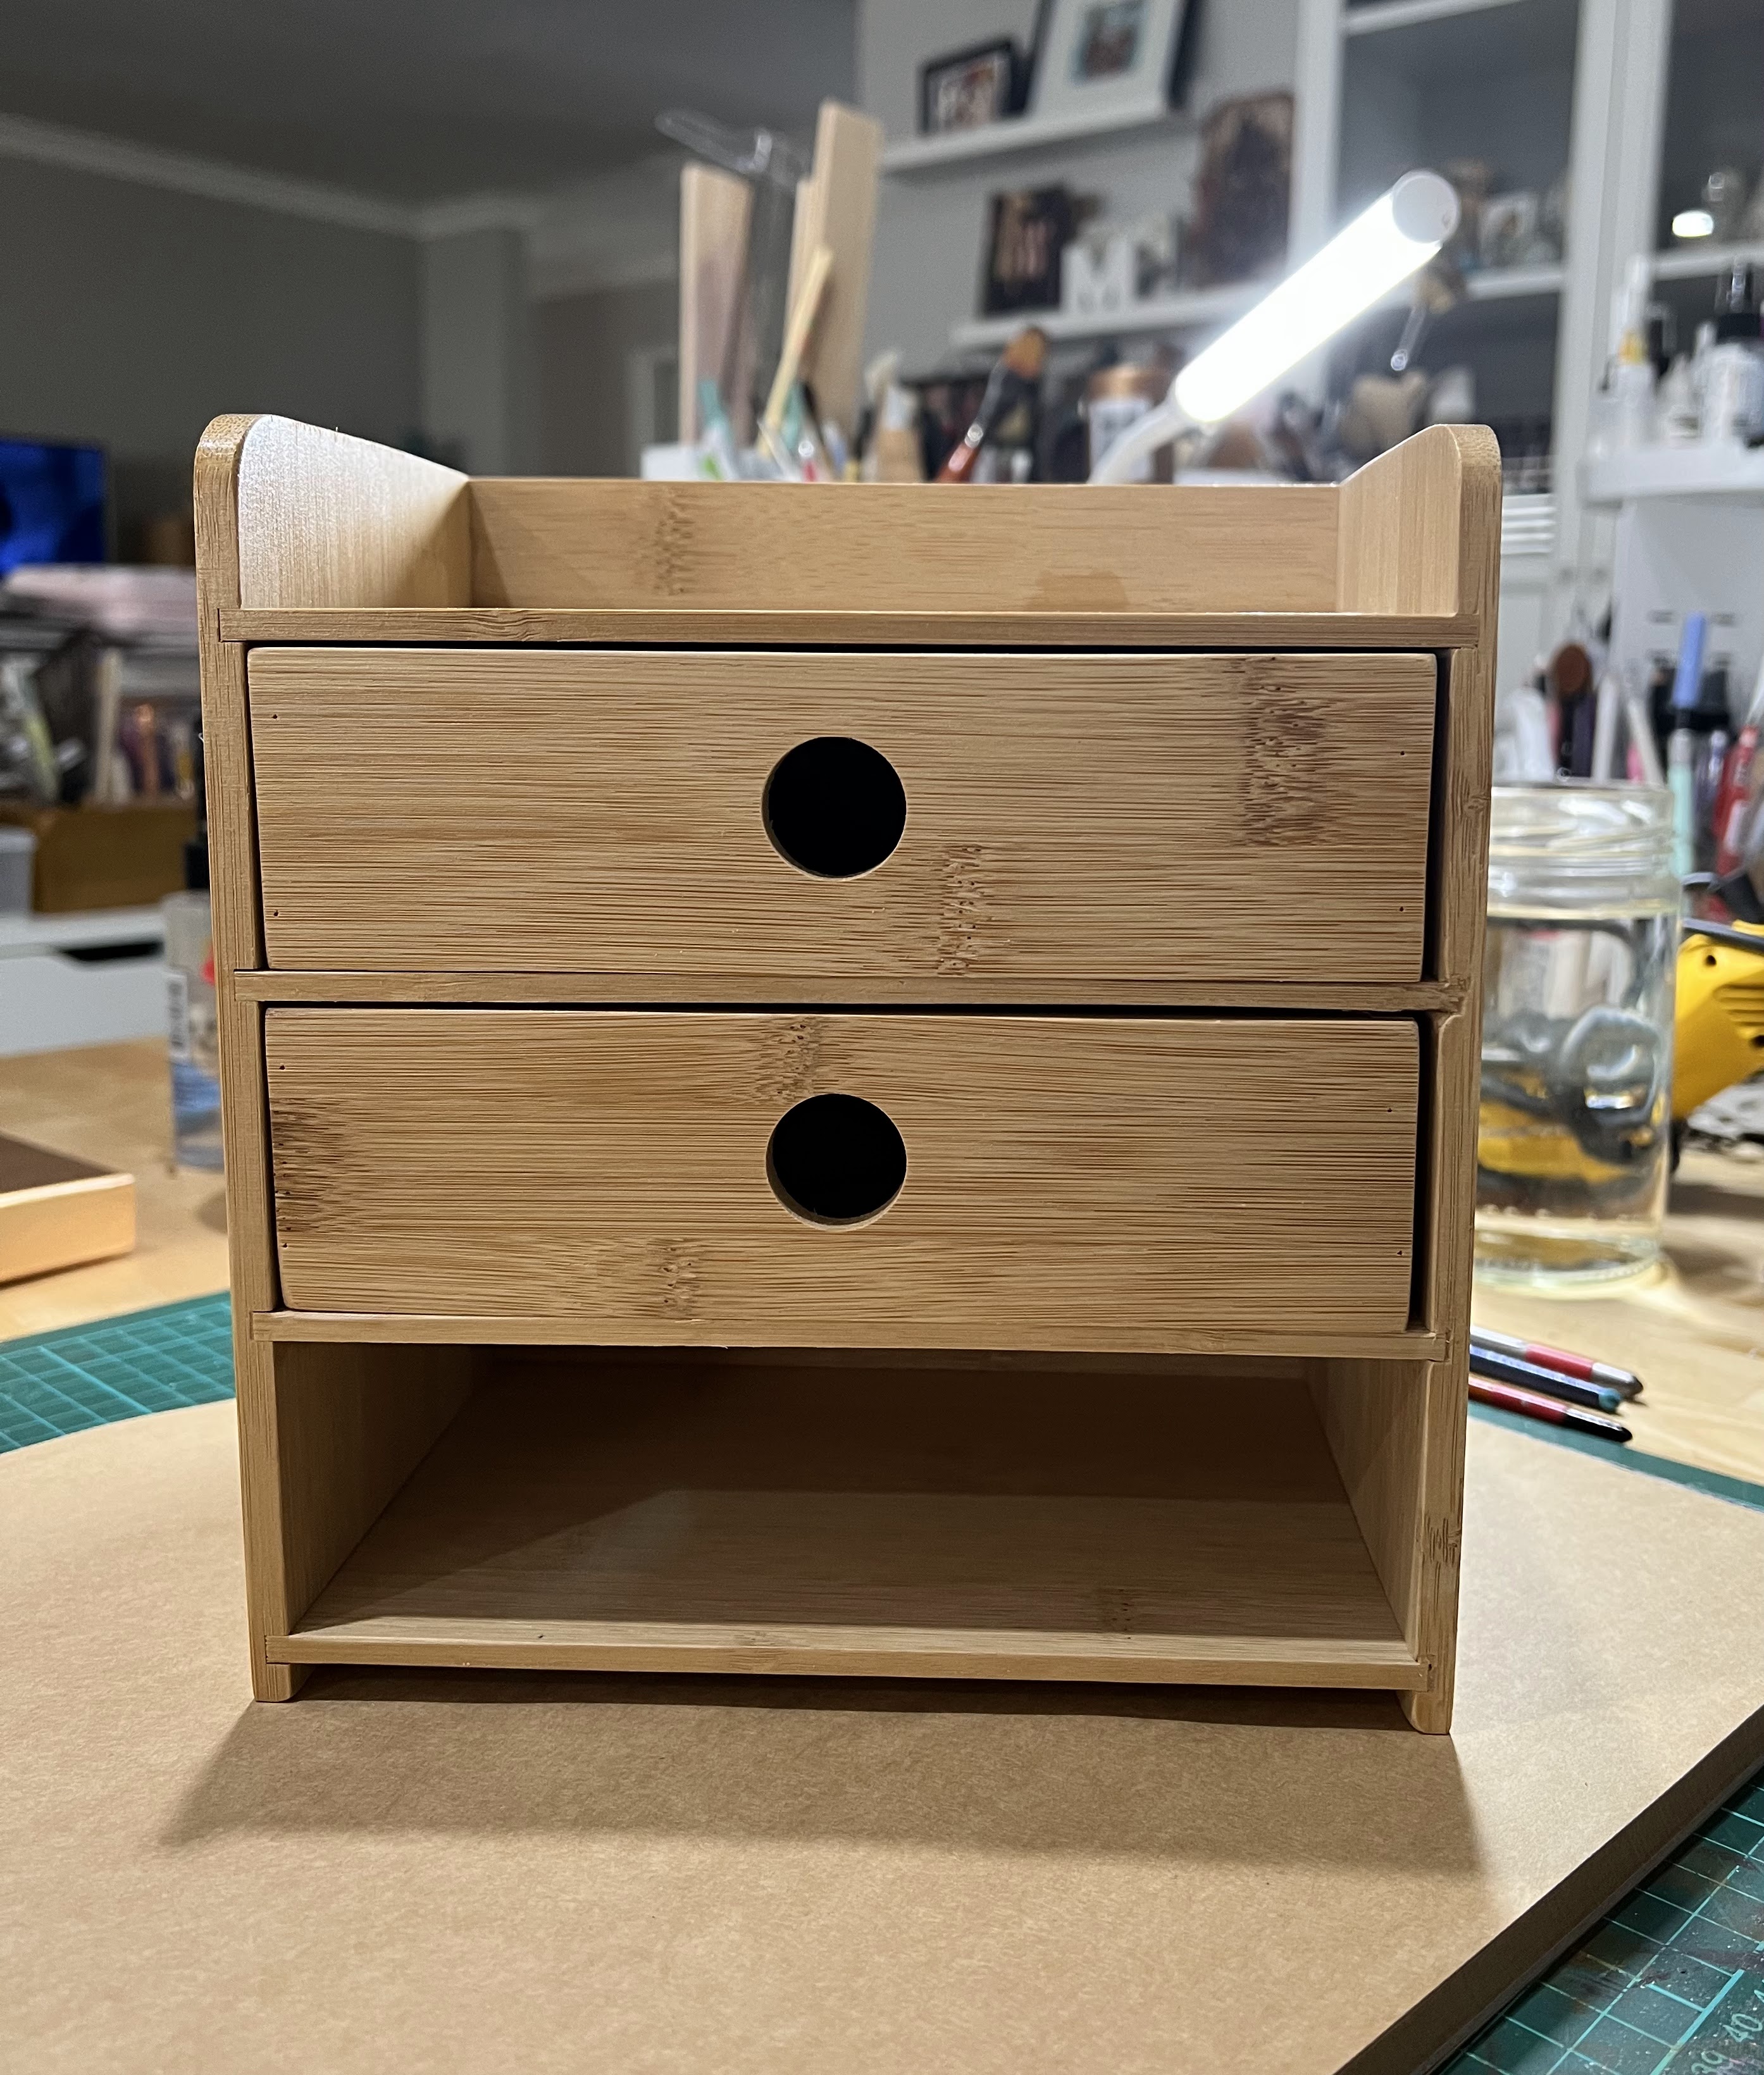
I have wanted to alter this little two drawer desk organiser from Kmart to keep on my desk and I figured it would be a great DT project for The Dusty Attic.


Finished Project


I bought this little Bamboo desk organiser from Kmart for this project.

To begin with I have painted the bamboo desk Organiser in a coat of primer 
as this will help paints and collaged paper to adhere to the surface.


I have covered the sides and back with Stamperia scrapbooking paper. I have also lined the inside of the two drawers with paper as well as the two front pieces to the top and side shelf,
 for the drawer fronts and exposed edges I painted them in acrylic paint.


I used a mixed media glue from Stamperia to stick down all the papers pieces and painted over the top of them with two more coats of the mixed media glue to seal them. This will keep the papers clean and waterproof later on.


I have stamped on the drawer fronts with a Stazon ink
 to give them a  nice distressed finish


I have painted the chipboard flourishes and houses in acrylic paint before gluing them to the panels with 
 mixed media glue.


Once all my chippy pieces have dried I have painted the entire organiser with Stamperia Antiquing Paste 
wiping off the excess with  baby wipes.

I think the end result was really worth it and I look forward to using my new altered desk organiser!


Supplies Used:

Dusty Chippy:

DA0873 Corner Flourish #4

DA2736B Houses By Nuneka

DA0606 Garden Frame set

Acrylic Paint:

Stamperia Allegro Ivory

Paper Artsy Fresco Finish Niagra Falls

Stamperia Primer, Mixed Media Glue and Vintage Antiquing Paste

Stampers Anonymous Fragments stamp

Stazon Ganache ink pad 

Papers from The Stamperia Sir Vagabond Aviator Paper pad 12 x12


Thank you for stopping by

see you next Time 


Mandy x


Sunday, 26 March 2023

Always & Forever Shrine - Amanda Herring


Hello There

I am back with my second Dusty Attic project for March  and I have used the ATC Shadow box to create a shrine.


I have used a series of cogs and Ornamental chippy pieces to turn my shadow box 
into a small ATC Shrine.
I love how the cogs and clock face give this piece the look of an old fashioned wall clock.


The paint colours are bright and I love the contrast between the ornamental shrine and the cogs and gears.


By cutting up the Ornamental Trim and Ornamental Pendants and spacing them around the ATC Shadow box gives a Mexican shrine effect.
Adding the winged frame to the front of the shadow box helps to add dimension to the piece.


Th picture above shows the beginning of how cutting up the Ornamental pieces give a shrine effect.


I painted a layer of gesso over the entire piece , once assembled, and then added some texture paste 
to fuse the pieces together and unifies all the layers of chippy.


Supplies Used: 

Dusty Attic Chippy 

ATC Shadow box DA0823F

Winged Frame Set DA1343

Ornamental Trim  #2 DA 1435

Ornamental Pendants #2 DA13650

Mini Cogs #3 DA3364

Jumbo Cogs #1 DA0232

Cogs #1 DA0001

Skeleton Clock Face DA1689


Golden Acrylic Paints:

Cobalt Teal

VanDyke Brown Hue

Titanium White

Quinacridone Nickel Azzo gold 

Smalt Hue 

Light Phthalo Green

Golden Gesso 

Golden modelling Paste 

Stamperia Mixed Media Glue 

Tim Holtz Mini People 

Tim Holtz Transparent Wings


Thanks for stopping by to have a look at my latest project 

Until Next Time 

Mandy x


Saturday, 11 March 2023

Vintage Junk Journal - Amanda Herring


Hello There

I have a new project to share with you today.

I have always loved bookbinding and decided to make a new junk journal using and old book for the covers and because I have used interesting mixed pages inside, I decided to do an exposed tape bound spine.


There are so many layers on this book cover! I started by adding a layer of primer and some stencilling
with glossy gel paste to add some extra texture to the book cover.


stencilling on front cover and then  painted with primer 


I then painted over these prep layers with acrylic paint in  dark red and brown 
acrylic paint.


Detail on back cover showing how well the hairspray technique worked.


I wanted to try a technique to crackle paint using hairspray, and I really love how well it worked.
I gave my base painted book covers 3 generous coats of hairspray allowing each layer to dry before adding the next. I then painted over this with Ivory acrylic paint.

I painted the Vintage Chipboard frame in the same colours used on my bookcover and added some crackle medium to these, even though the detail is so small that it hardly shows but I liked how it helps
to make everything look old.


When assembling the frames I added a base paper that I stamped with distress oxide on photo paper. This was a technique that Luise Heinzl shared with us on YouTube that was a  great way to get a permanent stamping that is waterproof. 
Her video is worth watching 


The Stamped photo paper looks really old and distressed once dry and is waterproof once  dry.

For the vintage frame I have used acrylic paint and patina waxes to distress and colour the assembled frame. I have also coloured the Cherry Blossom chipboard piece with acrylic paint pens,
I then added a layer of embossing powder in vintage beeswax which gives an aged effect.


I have lastly added some paint splatters to finish off the frame assembly.
The vintage patina and the distressed watercolour background give a really nice aged effect to the 
Cherry Blossom centerpiece. 


Supplies Used:

Dusty Attic Chippy: 

Cherry Blossoms DA3311

Vintage Layered Frame DA2340

Stampers Anonymous Baroque Stamp CMS400 Distress Oxide Inks in Walnut Stain and Vintage Photo.

Stamperia mixed media glue, primer, gesso and Glossy Gel,

Stamperia Allegro Acrylic paint Super Gold, Earth, Old Ivory

Paper Artsy Crackle Glaze and acrylic paints in Rose , Gold Rush and Blood Orange.

Seth Apter Vintage Beeswax embossing powder.

Stamperia stencil KTSDQ35 , Stamperia Aqua colour Leather and vintage Antiquing Paste

Art Alchemy patina waxes White Gold, Vintage Gold and Peacock.


Thank you for stopping by 

Until next time 

Mandy xx


Sunday, 26 February 2023

MDF Card Holder - Amanda Herring


Hello it’s my turn today to share a project and I thought that I would share the Card Holder that I made to store my Altered  tags in.

I used The MDF Card Holder for this project.


To start with,  I used PVA glue to stick the panels of the card holder together, and once totally dry 
I collaged old book paper over the entire outside surfaces of the box.


I have then used rub-on’s from 49 and Market to add the images of birds, leaves and butterflies to 
decorate the panels.


I painted the inside of the Card holder in charcoal chalk paint and when dry i added a broken and patchy layer of Turquoise Chalk paint on top.
After these layers were totally dry I added a thin coat of Paper Artsy crackle medium and let that dry.

I have then painted over the top of all these layers with a light coffee coloured acrylic paint, and once dry all these gorgeous and textured cracks appeared giving the box a really nice old feel.


I have added chippy pieces for extra texture that I have painted with acrylic paint and added a little crackle to and some textured crackle paste in white to random areas on the box.


To finish I have added building wax in gold th some areas and added box feet from the Tim Holtz
 idea-ology range.


I love how my altered tags from my last DT post look in the Card Holder
I might have to make a few more!


Supplies used:

Dusty Attic 
MDF Card Holder DA3386
Sweet Pea Frame set DA0573
Corner Flourish #1 DA0628
Mini Scrolls DA0685

49 and Market Meadow Rub-Ons
Stamperia Mixed Media glue
Stamperia Crackle Paste - White
Prima Chalkboard Paint - Charcoal and Sea Breeze
Pantone Acrylic Paint - Cafe Au Lait

Paper Artsy Fresco Finish Crackle Glaze
Ranger Idea-ology Box Feet
Old book Papers 
Building wax in Gold 


Thanks for stopping by
See you next time


Mandy x


Saturday, 11 February 2023

Mixed Media Tag Medley - Amanda Herring


Hello 

Well January has certainly blitzed by!

I am here to share my first project for February for The Dusty Attic.


I have made a set of three mixed media tags using the larger tags from the Tag Medley 
Chipboard set.
To start with I have covered the chippy tags in scrapbooking paper as my base and then I added chippy pieces and crackle paste for extra texture.


Once dry and crackled I have added dye ink and mica sprays to unify the colour palette 
And add colour to bring out the textures.


I have painted some chippy leaves and added these to my tag bases and then I have then  fussy cut leaves and flowers along with a few laser cut out butterflies from 49 & Market, to complete my tags I have added some ink spots in white and black.


Tag 1


Tag 2


Tag 3


Supplies used:
Dusty Attic Chippy:
Tag Medley
Corner Flourish #1
Damask Panel Large 
Foliage #15
Foliage #19

Papers:
49 & Market Remnants
49 & Market Serenety Laset Cuts
AB Studio Gentle Wind
AB Studio Leafy Paradise 
AB Studio White Butterfly 

Stamperia Mediums:
Mixed Media Glue
Gesso
White Crackle Paste 
Clear Crackle Paste

Glimmer Mist sprays:
Bell Bottom Jeans
Latte
Tattered Leather
Graphite


Thanks for stopping by 
Until next time 

Mandy xx