Friday 30 October 2015

Be Happy - Lisa Gregory

Lisa is on the blog today with the stunning layout to inpire you for the Mood Board - you still have until mid-night 31/10/2015 to enter for this month for your chance to win a $100 Gift voucher to the
 
 
 Welcome to the October Mood Board Challenge. It amazes me, what just a few colors can do to a project. My inspiration from the Mood Board came from the words..Glow and Heaven..and the color Gold. I added the darker blue for a bit of contrast. I was going for a gilded frame look again. I achieved it using the larger piece in the Garden Frame set. I also wanted it to look like the frame was carved out of the background and that was easy to achieve. See closeups below. To prepare my background, I mounted white card stock onto a piece of corrugated cardboard, then I painted the whole paper with Dusty In Colour Mountain Meadow and let it dry completely.


In order to get the feel that the chipboard was a wooden inlay, I coated the back of the frame chipboard  with a layer of texture paste.  Not to thin, but not to thick. I laid the chipboard onto the background and pressed down gently until the texture paste squeezed out the sides a teeny bit and I let it dry. Then I painted it with Mountain meadow.


Once it was entirely dry, I used the Mountain meadow and sealed the edges of the chipboard by brushing the paint into the edges of the chipboard paying special attention to the nooks and crannies, until you could not see texture paste or the edges of the chipboard.


This made it look like the chipboard was carved out of the background.  Once I was satisfied that all of the edges were totally sealed, I placed the Dusty Attic Fan stencil in the middle and lightly sprayed the entire layout with Lindy's Stamp Gang Glory of the Seas Gold. Then using a gold wax medium, I rubbed it over the chipboard until I got the coverage I wanted.


I painted my printed dragonflies with a bit of the Mountain Meadows paint watered down with water. Using it full strength, I rubbed it on the edges of the paper layers under the photo. I used gold on the photo.


 I also rubbed the gold wax medium onto the word disks. I gave it a couple of coats and they looked like metal pieces. I used Rub'n Buff.


I tucked the Dusty in Bloom flowers under the photo layers and I layered some of them on my die cut flowers.

I simply love dragonflies!! And everything Dusty Attic!!  Thank you for joining me this month at Dusty Attic. I hope you were inspired to try a new technique and follow the mood board!! 


Dusty In Bloom Smokey Blue


Wednesday 28 October 2015

Love this - Lisa Gregory

 Hello Dusty Attic Lovers. I wanted to do a pink layout this month for Breast Cancer Awareness month. My wish is that that by the time my sweet  Grand-daughter is a young adult, that we would have found a cure, so her generation will never have to deal with it. I see 2 Indian Feathers Representing Strength and Courage, A split circle vine that will one day come together to make whole again, and an arrow to battle the monster of breast cancer. This is in honor of all of the survivors, and in memory of the ones we have lost...
For the background,  I mounted a white piece of card stock onto a piece of cardboard for stability, then covered it with gel medium. After it dried, I used color mists and water until I achieved the saturation and design I wanted. I did some masking with texture paste on random spots, and sprayed it again till the color fell into the cracks.


I prepared the feather with a VERY light coat of white gesso. When it dried, I heat embossed embossing powder in  couple of layers in a couple of different colors. I then took a white wash coating of gesso and wiped it after applying it. This gave it a metalic look with a hint of patina from age.


I created layers of distressed patterned paper, burlap, cheese cloth, and jute to mat my photo.


Once the flowers were all placed on the layout, I dry brushed a bit of gesso over them as well to tie them into into the  layout. 


Here is another closeup of the other feather showing more detail in the pattern. Since the embossing ink didn't touch the grooves, they stayed free of embossing powder, and the powder just blew away during the heating process leaving the detailed pattern of the feather intact. The wash of gesso settled in the grooves and it created an old worn metal look.


I heat embossed the Love This Arrow after it was primed with white gesso. Sometimes I give it a second coat and that creates a texture with the embossing powder.


Here is a detailed look at the layers of the photo mat. To achieve dimension and height, I adhered small pieces of corrugated cardboard between each layer. This technique is less expensive than using pop dots and I always have cardboard readily available. 


The Vine Frame was also heat embossed after giving it a coat of gesso. This allows the color to be more opaque than transparent.


Thank you for joining me this month. You can see more photos and details on my blog with information on joining the Moodboard Challenge and who inspired me to create this layout. Check back in often as The Dusty Attic designers continue to inspire us all. 

 My Blog
xo
Lisa


Dusty Attic Products:

Tuesday 27 October 2015

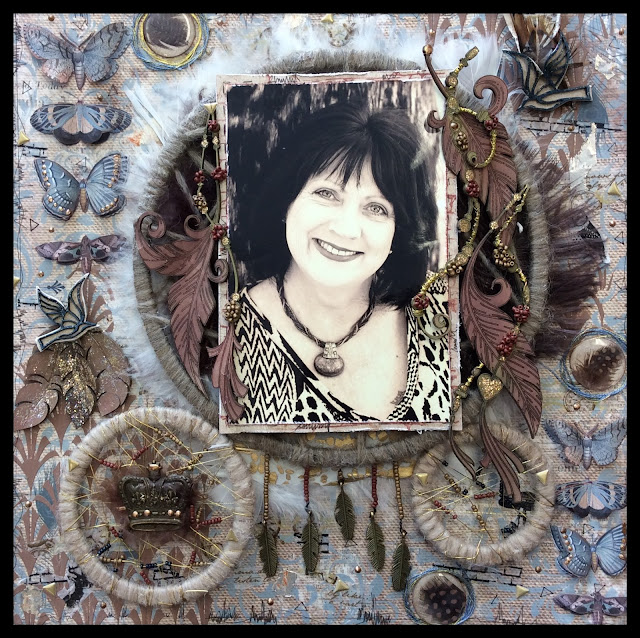
Dream - Jen Burns

I have many things that I love, Reindeer, Rocking Horses, Crowns, Fleur DeLis, Shabby anything, birds, bird cages, Wings and of corse along with birds comes feathers and butterflies and dragon flies !
(I even have a feathers tattoo around a dream catcher symbol on my thigh!)
 
 
So this layout pretty much sums up some of the things I love all in one creation !
This paper is just stunning and perfect for this photo that a gorgeous Jen Hall took at Camp Mojo !

I have used two pieces of the same sheet to 3D the butterflies and moths and I have used the back to matt my photo as well.


I started with adding Dusty Attic Chocolate paint to the new DA Texture Paste and using the Fan stencil added extra pattern and depth to the top and bottom corners and here and there over the entire page.
 
  Fan Stencil DA1320  
 
Hot Chocolate DA 0923

  
Texture Paste  DA 1218


I then added doodling around the edges and different designs of washi tapes and triangles added around as well.


Mini tutorial on making your own feather pebbles :
Stick your feathers to the paper with double sided tape and place your clear pebble over the piece you want to use. Cut around the pebble and sand, then ink around the edges
Wha-Lah, done !


I have used the circle frame set as the dream catchers and wound wool around the edges. Gold thread and beads complete the web section of the Dream catcher


Circle frame set DA0490


The feathers I have inked with a brown and golden green ink pads then used 13 Arts Gold Glitter paint and gold thread and beads to finish them off. These feather charms are some of my absolute favorites of Dusty Attics !

 
Feather Charm #2 DA1381


Feather Charm #3 DA1382
 
Feather Charm #4 DA1383
 
 
Behind the large dream catcher are craft feathers, white and brown mixed together, the photo is mounted using the back of the second piece of paper with some chipboard behind it to add height.


I have added Metal embellishments, the Crown and mini feathers with beads. 

 
Lightly brushed the 13 Arts Gold glitter paint over the mini feathers and added a new bird design that allows you to have the background as anything you wish as they are two pieces where one sits on top of the other.


Mini Feathers DA0650


Doves DA1407


Tucked into the ripped edge Peep hole are some more fluffy craft feathers, with washi tape and another layered dove. I have added Liquid pearls to the paper as little dots randomly on the page, the wings and on the metal crown.


 I used to do Paper Tole and love it when I can add other crafts I have learnt into my creations - hence why I usually get two or three pieces of the same paper, to make sure I have enough to 3D the main elements. Helmar "Liquid Scrap Dots" (LSD) is what I use to keep the wings up for the flying type of effect.
Thank you for joining me today

 
Jen xox
Jen Burns


Monday 26 October 2015

Our everyday life - Heather McMahon

Hello and welcome back to Dusty Attic! It's Heather McMahon with you today and this month I have made something VERY different for me! There's no particular reason why this is so different - I just wanted to try something new.


Don't you just love that flourish under the photo? I wanted to show it off so I cut my patterned paper to suit. Here's how I decorated the flourish, the border and the title. It's really easy but looks fabulous!

Step 1

Add some Dusty Attic texture paste directly to the bare chippy with your finger. Dab it on roughly to create a stippled effect.

Step 2

Colour it with gold ink. This leaves you with a gorgeous textured piece plus the gold ink over the white texture paste creates a stunning pewter colour.

To make those flowers and leaves on the background, I simply applied the gold ink through a Dusty Attic stencil. I love the soft, airbrushed effect.


Here are the Dusty Attic products I used:

Texture Paste DA1218

Flower Burst Stencil DA1323

Ornamental Trim Set DA 1347

Lace Border #3 DA1344

Mini Captions #3 DA 1290

Foliage #3


Thanks so much for dropping in!


Happy scrappin'!

Heather McMahon