Sunday 30 June 2019

So Much Goodness - Jenny Jacques

Hi everyone!

It's my turn now on the blog for my Mood Board project layout of June.


I have take a 49and market paper from the Bold and Beautiful collection as my background.
I've applied clear gesso and then, some modeling paste through the 
Creative Script Dusty Attic stencil (as you can see on the picture below)


I've builded up my focal point by layering some pieces of papers from the same collection, 
and tuck all of the String frames chipboards in it.  
All of these chippies are heat embossed with Lindy's stamp gang powders.


The title came from Mini Caption #10 and is also heat embossed.
I have complete this layout with some flowers from different companies, die-cuts from my 49andMarket kit and that was it!  Hope you will like it.


Don't forget to play with us with our monthly moodboard challenge that you can find here

Take a look :)


And now, the list of the products I've used on my layout


See you next month :)


Brotherly Love - Kristy Abela -Mood Board Inspiraton


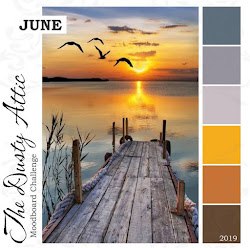
Hi there Attic Dwellers... Today I get to share with you my Mood board Inspiration for June! I took this picture of my boys last year in winter. We were out at Coogee Bay for lunch and took a stroll along the clifftops! Absolute perfection. 


Here are some close ups of the finished product so you know what techniques to look for in the post! 


I started out creating a base for my page... I like the wood paneling as it recreated the jetty. 


Using my tool of choice, the brayer, I added some custom colour to the background to better reflect the colour pallet. I added some vertical and horizontal lines to break up the splotches and frame the jetty.


I created some texture with a harlequin stencil and used some light and fluffy paste. I really like this paste as it leaves a raised dimension without needing to add a lot of paste to your page and avoiding stencil bleeds... Ew! I used some water based crayon to highlight the ridges. I rubbed it onto my finger and lightly brushed it along the stenciling.  


I highlighted the edges of the wood paneling with Distress ink directly from the cube. I love this look as you often get striations in the ink. 


I was handed a bottle of this to play with... So I did! I applied a generous coat to my chipboard and left it to dry naturally overnight. I used mica sprays to colour the chipboard and I didn't prime it first as I wanted the cardboard to soak up the colour and leave the shimmer on top.


How good does that look!!
I used glossy accents for the reeds. 
I wanted some variation in the texture. 


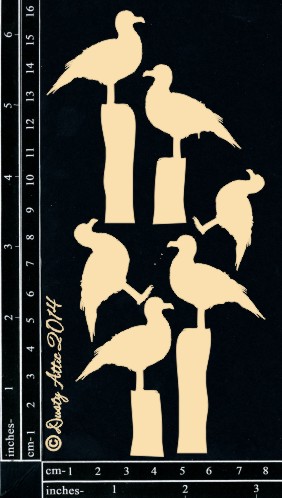
I have been eyeing these little beauties off for a while now and finally got my chance to showcase them! 
I dabbed them into white gesso and created peaks in the acrylic. I also added a little Fluid Acrylic to colour the wings on the seagull. 
When i was in Arizona for Creativation i was taught the technique i used on the posts. 
OK.. I'll share!
With this one you use a powdered watercolour pigment. I used a little Satin Glaze Matte for this but you can use any clear drying medium to create the effect. Sprinkle a little pigment onto the chipboard and wet your brush and swipe! Perfect woodgrain every time!!


To complete the page I added Splatters, Stones, Sisal and Beads. Thanks for stopping in to look at my latest creation. 

Please pop on over to our Dusty FANattics page on Facebook and show us what you have created!!
Ciao for Now...


Dusty Attic Products Used


--
Kristy - Abela Artistry
https://abelaartistry.blogspot.com.au
https://www.instagram.com/abela.artistry
https://www.facebook.com/abela.artistry

Saturday 29 June 2019

Perfect Moment - Adri Du Preez - Mood Board Inspiration

Hello everyone!


This is my layout inspired by the very beautiful and romantic June mood board. 

This is a photo of the spectacular sunrise I took during our vacation in Mozambique. Mozambique is an excellent holiday destination offering warm waters and white sandy beaches in a rustic paradise.

Sunrises are, in my opinion a sneak peek of Heaven, a new beginning every day.  We should all give God humble thanks for each new day and start every day with gratitude.  Sunrise is a magnificent time of the day.  Some days the sun rises amidst scattered clouds, some days it rises fully covered by clouds, and some days it rises without a cloud in sight.  No matter what, the sun always finds a way to make its entrance.  I love the sunrise, it warms my heart and gives me a ray of hope.


Here is the mood board.

and here is my layout.

For the background I used pattern paper from the 49 and Market collection, Island Paradise. 


This is how I treated the chippies. I have used lots of Dusty Attic goodness!


I covered the small seagrass, the lighthouse and the seagulls with black gesso to create a silhouette scene at sunrise. I dusted the sides of the sea grass and lighthouse with yellow and gold acrylic paint as a reflection from the sunrise.

I painted the seagulls with grey acrylic paint and dabbed white acrylic paint on their tummies, for a soft feather look.  The log was first covered with coarse gesso.  Once dried I covered it with white acrylic paint and dabbed brown ink on the coarse parts.  The skeleton fish were painted similar to the seagulls.


I inked the fish net panel and drift wood with Walnut stain and the edges with Black Soot and dry brushed with white acrylic paint.


The shells, crabs, lobsters, urchin shells, seagrass, starfish, coral, seaweed and ships wheel were covered with white gesso and painted with acrylic paint.


The cobble stones were inked with Iced Spruce distress oxides and spritz with water for a mottled effect. I inked the edges with Black Zoot.


some close ups.


When everything was glued down I added Art Stones and splatters with diluted white gesso and black ink.


DA2193 - Drift Wood #2

Thank you for visiting my blog.  I hope you find some time to play along with this beautiful mood board.  Please visit the Dusty Attic online store for more amazing chipboard designs.


Have fun and happy crafting!