Hi there!
Today's post topic is in reference to my private life. What a month it is! It's barely started and I've already made a whole bunch of important decisions. My commitments, plans and dreams for 2023 are already in a clear shape. Here I would like to say a huge thank you to all the lovely girls who lifted my spirits on Insta when my batteries were running low. I am so happy to have so many empathetic people gathered around me. Thank you from the bottom of my heart!
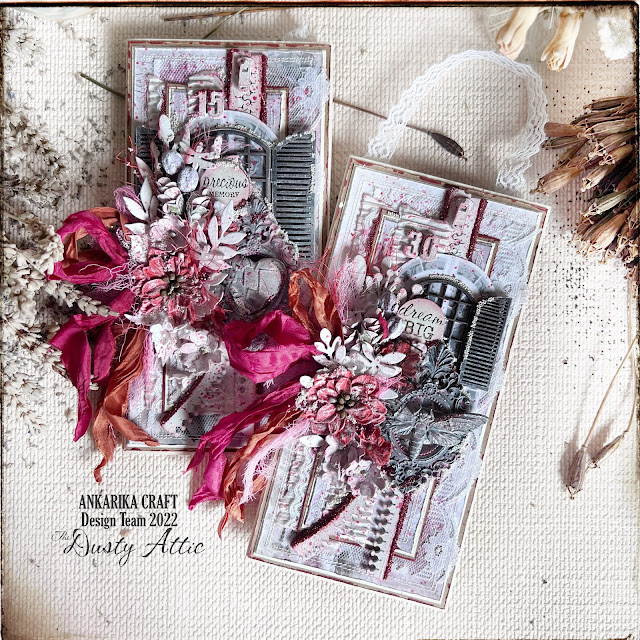

I was eager to make these two fantastic twins inspired by the colours of December on the Dusty Attic blog. You know.. When you're short of ideas for a project, you simply should hop over to your favourite blog and there's no way you won't find a proper inspiration. So... I'll show you what I was inspired by and you'll let me know if I managed to inspire you to take part in the Dusty Attic blog challenge. All you have to do is add your work to the comments section on the Dusty FANattics Facebook group for a chance to win one of two amazing $50 (AUD) prizes to shop the shop. I'm already looking forward to seeing your work on the Dusty FANAttics group.

The base this time is a paper from the 'Love me tender' collection by Margaret Paper Design. It is lined with beige and craft paper for a double frame. This also makes it stiff. I double sewed the edges on the machine with white thread, all the paper layers were slightly torn and the craft paper was additionally brushed with burgundy paint - lightly and delicately - just to give a touch of colour. I layered a delicate lace over the entire surface, on top of this I placed a piece of torn corrugated cardboard, white in colour and also lightly painted with burgundy acrylic paint. I prepared the smaller piece of paper laid out in the centre of the work in exactly the same way and backed it with another piece of lace on one longer side. Another layer of corrugated paper went on top (the insert from the biscuit box!).

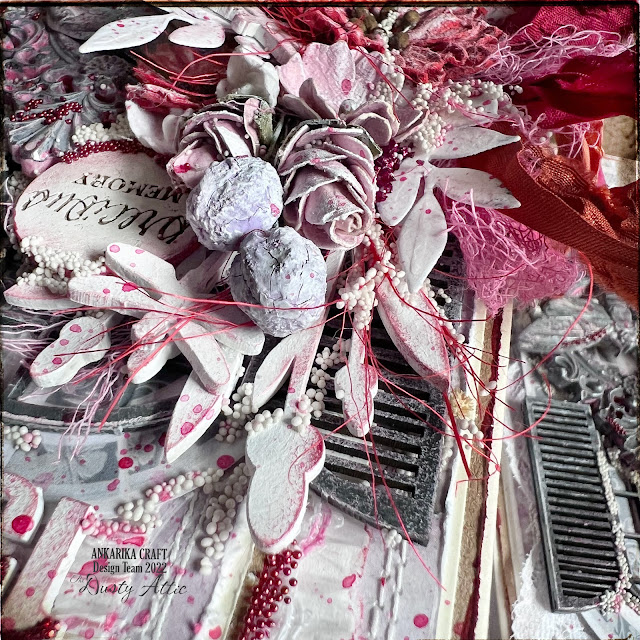
Can you see the zipper sticking out from underneath the composition? How I love that accent in scrapbooking projects!!! I used it about a year ago while making a LO in a forest theme, and here I used the unused leftovers I still had. Yes, because you buy these zippers in a kit and there is quite a lot of it to use. This time the cardboards are prepared in two ways: I protected some of them with white gesso and painted them with white acrylic paint, then I gave the colour as gently as I could with Indian Pink wax from Finnabair. Meanwhile, I protected the shutters with black gesso and then played around with alternating waxes: White Pearl, Old White and Indian Pink to achieve the effect shown in the photos.

For this project I decided to try my hand at working with moulds. About two months ago, I bought some moulds, two-component resin and made myself a decent number of moulds, which have been lying around me & laughing at me ever since. So I gave it a try and let me tell you, it's a fantastic addition to the projects. I don't feel an ardent love for it yet, but I'm eager to get my hands on the moulds, especially as I have quite a stock of them. I secured them thoroughly with white gesso. After they had dried, I applied black gesso residually and carelessly, leaving a lot of white showing through. Once dry, I applied red acrylic paint only on the frames. Then, using a brush, I applied Old White wax very meticulously, allowing the colours to fade. Finally, I highlighted all the reliefs with White Pearl wax. How do you rate my first approach to moulds?


I paid considerable attention to the floral composition on the design. These are beautiful red flowers (whitened with white acrylic paint) mixed with delicate pink flowers from 49 and Market. Sticking out in a few places are tiny white daisies from Tim Holtz. For the underside, I arranged tinted gauze and fantastic cardboard leaves complemented by paper leaves. Among the flowers you'll find cute little dragonflies and at the top you'll find numbers: 15 (Wedding Anniversary) and 30 (Birthday). Sticking out from underneath the composition is a piece of filmstrip and a round banners with the words "precious memory" & "dream BIG". Finally, I decided to add fantastic bows made from Old Fashion Ribbons.


I used red embellishments to finish the project. I placed sisal between the flowers in several places. With Indian Pink wax I highlighted the round banner, the zipper and numbers. Along the zipper and also in several places on the work, I added crushed bits, tiny maroon and white balls and glitter. Finally, I splashed the work with red acrylic paint. Thank you for your attention, please share your feelings with me in the comments.

Dusty Attic products:


See you soon!