Tuesday, 31 October 2023

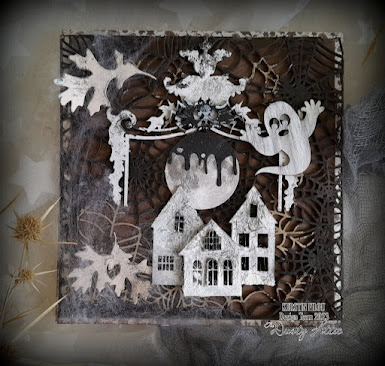
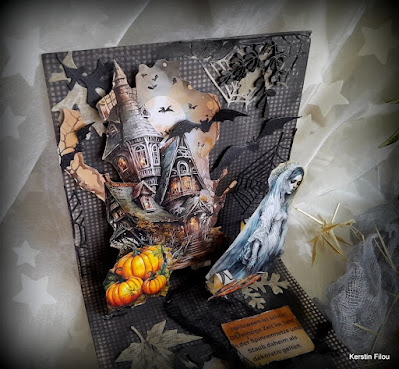
Halloween Card - Kerstin Filou


  Hello everyone!


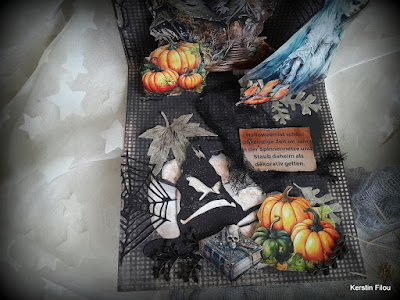
 Today a new Halloween inspiration, it's a pop up card with fun.

I enjoy creating spooky Halloween scenes, filled with imagination and a touch of humor.

 This 3D card is intended for those who prioritize more important things  over constantly cleaning their home. 😁


Halloween is wonderful, it's the only time of year 
when cobwebs and dust are considered decorative in the home.


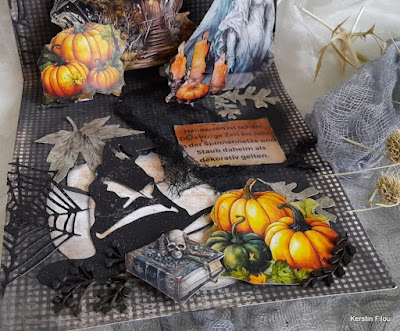
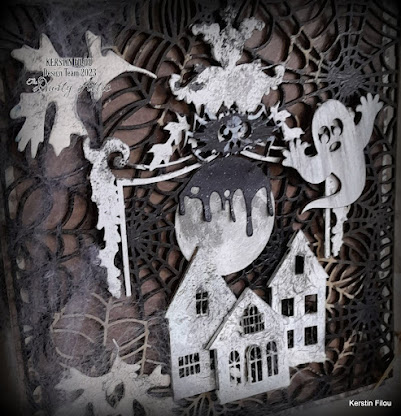
 some close up's


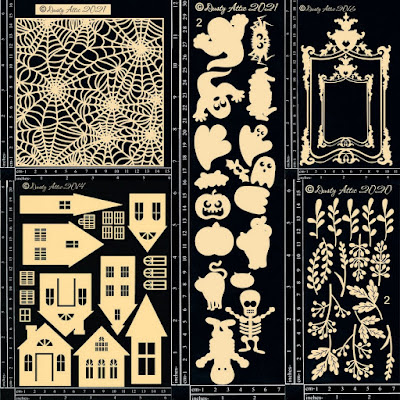
 used chipboards


Main Street 
 
 Spider Web panel small 
 
Antique Frame
 
Halloweenies #2
 
Mini Foliage #2 
 
 
 Have fun!


Monday, 30 October 2023

Dream with your eyes wide open - Adri Du Preez

 Hello everyone!

Welcome to the blog today. 

My October design team layout features beautiful Dusty Attic chipboard pieces.  

This photo is of my sweet granddaughter when she was only two weeks old.

Here is my layout.


All the chippies were first primed with a layer of white acrylic paint and then painted with Americana Acrylic paint.

The beautiful Big Moon was also heat embossed with embossing powder.  I used Silver, Lindy's Groovy Granite, and Iced Enamels Relique Powder in Ivory.


I painted the title with Orchid {dream} and Pansy Lavender {with your eyes wide open} and 
dry brushed with white acrylic paint.


The words from the It's a Girl set and Leaves #2 were heat embossed with white 
embossing powder.


The Seedlings were painted with Mint Julep Green and dry brushed with white acrylic paint. 
I snipped the foliage into pieces and tucked them into the flower clusters.  The Leaves #2 were heat embossed with white embossing powder.


The stars were painted with Orchid, Pansy Lavender, and Turquoise Blue and dry-brushed the edges with white acrylic paint. I then added Ranger Stickles in Platinum for a bit of shine. A few of the mini stars were glued onto the larger stars. I painted the Page Pebble with Orchid.


Dusty Attic products used.


The final touches to this layout included pearls, glitter, and splatters with diluted white gesso.

Thank you for visiting the blog today. Visit the Dusty Attic online shop for more amazing chipboard designs.

Happy crafting!


Sunday, 29 October 2023

This Was Super Fun - Jen Burns - Mood Board Inspiration


How awesome does this Tree Climb walk look right at our own backdoor at Yanchep National Park? Kyden and his Brothers had "Super Fun" 
The new 3Quarter Designs with Dusty Attic new collection called "Incredible Journeys" is perfect for these photos.


I have started with one of the new awesome Collage Frameworks Frames and painted with Stamperia Grey paint Dark to light Ombre style with dry brushing some light highlights. I have also painted the Hexagons by Nuneka the same way and added them to the sides of the framework.


The Toadstools pack 1 and 2 have been painted to look like mushrooms and layered at the bottom Cluster along with some foliage and mini Cobblestones.


"This was Super Fun" title was painted with Stamperia paints in an ombre fashion starting with Tortora at the top then Cappuccino and finished with Mattone which has also been used to paint the mini Filmstrips. Super Gold has been dry brushed over the top to add highlights.


"This was Super Fun" title was painted with Stamperia paints in an ombre fashion starting with Tortora at the tiop then Cappuccino and finished with Mattone which has also been used to paint the mini Filmstrips.


Paper Pack and Chipboard pieces used that are all available on the 


Saturday, 28 October 2023

Trick or Treat Pumpkin Diorama - Deb Stephens


It's that time of year again where we get to indulge ourselves making quirky and kooky Halloween creations!
I used LOTS of Dusty Attic Chippy and other products to alter this Kmart paper mache pumpkin and turn it into a diorama!
The inside background was made with crackle paste and alcohol ink. 

DA0178 Bats 8pk were painted black and stuck onto it. I also assembled DA3124Haunted House #1 and DA3125 Haunted House #2, painted and embellished the roof's with black Quickcure clay, and dressed the windows. Glow in the dark paste was also applied. 

But the Stars of this show are the DA 3101 - Halloweenies #1! They are just so cute! They stand behind the DA0615 Tombstone borders I used as a fence. I also used Quickcure clay to sculpt the "tree" that edges the cut section of the Pumpkin. I embedded creepy eyes into this too.

Lights were added inside the diorama and DA1865 Web corners were glued together to make the front decking. DA1790 Wordpl@y #6-black gave me my trick or treat signage. The lights are great to highlight the small space inside, but also to charge up the glow in the dark paste that was applied. This photo isn't great, but it gives you the idea.

To dress the outside of the pumpkin, I cut the DA0183 Mini Bare Tree #2 in half and glued it to either side of the opening. 

I ran the rest of the Tombstone Border chipboard around the back of the pumpkin. 

 I also stenciled texture paste through the DA3062 Spooky face stencil, and finished with Waxes.

I dressed the top of the pumpkin with DA1460 Ivy Flourish, Black roses, Skulls, pumpkins and Spooky Tule fabric. 

This was a very fun project to make and there is a YouTube tutorial available on my Chanel, linked below,  if you are interested in the process. 

https://www.youtube.com/@DebsPalette

Below are a few more photos and a list of all the Dusty Attic Products I used. 

Until next time, take care!


Friday, 27 October 2023

Twin Cards - Ankarika Craft - Mood Board Inspiration

 Hi there!

Just see what I turn up with! It's unbelievable! Twin cards again... ;)) Well, what can I do, since I like creating sets so much? I just really hope you don't get bored of the same formats, since I try very hard to make it in a different style, different themes and colours....So what? Can you keep up with me? ;))


I made them with a person in mind who likes hiking in the mountains, contact with nature, the colours of the earth.... That's right! The colour scheme is taken from the ongoing challenge at The Dusty Attic. I've already done my inspiration in these colours this month but this colour palette resonates with me so much that I decided to prove myself again. It was highly enjoyable to work with!


I start my work description with the base. The paper is DCWV, I love the texture, weight and design. I'm slowly running out of The Old World collection but I already know that I will soon be in possession of an absolute firecracker in the scrap paper world. I will tell you more about it in the next post! 

The paper is hemmed at the edges four times, with a fairly fine stitch. It is underlined with a graphite border. With black ink, I made a few fine-print stamp prints. At the top, I mounted the hang in brown and colour-matched the screw heads visible on the corners.


I prepared all the other cardboards in the same way, only changing the intensity and colour proportions between the different elements. They were protected with white gesso, but not very thoroughly. Then I spot-applied 5 different shades of structure paste from Finnabair.  I achieved some amazing shades by mixing them together, see in the close-up how fantastic it looks!  Finally, I very gently added gold wax on the edges - it's on all the elements, thanks to this treatment I kept harmony on the project.


The composition is laid out rather laboriously. There are about 15 overlapping layers. They alternate between industrial chains, a whole bunch of paper trees, a deer, a grass cluster, a Moroccan/chicken wire style circular panel, a field plant, industrial globes, small pebbles in various sizes, a paper mountain motif in a shade to match the frame around the card.  On the bottom, you can see the cardboard pieces that I had left over as waste from the zippers kit and also leftover gear border that I didn't use for an earlier project. 


The deer and bulb are gently whitewashed. The whole work is splashed with white dots and it is still worth mentioning the wording that completes the composition: "Just for you" and "Thank you". one of the cards is already personalised and I added Bible verses there according to the client's wishes. Please let me know in the comments whether you like this design.


Dusty Attic's products:


Thanks and see you soon!