Friday 30 November 2018

Notebook November and Mood Board inspiration - Tina Ollett

Hello and welcome Dusty Attic friends. I hope this post finds you well. Today I have my share of my moodboard inspired Journal Cover. I hope you enjoy it.
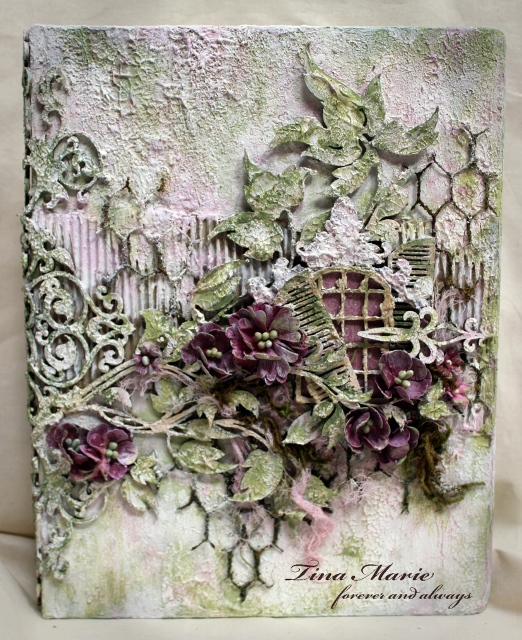
I have to admit that a journal cover is a very new thing to me. I am solely a scrapbooker but now after doing this and getting out of my comfort zone I am so going to do another very soon. I have had this journal book for so many years it is just not funny. It has sat in a box already primed in black gesso. I still had the pages wrapped in glad wrap to protect them from the gesso so that is as far as I got. Now black for me was just not going to work with this project. So I covered the black with Dusty Attic's Pesto Acrylic paint toned down with a little white gesso. This for me was my starting point. From there it took me a lot of days of going backwards and forwards to my artroom to play. There were many differing Dusty in Colour used for this project. I have listed them below for you to refer back to if you wish. They are;
[gallery grids="News" image_size="shop_catalog" tiles="true" size="medium" ids="1990,1986,1985,1988,1984,1987"]
All available from here.
After painting the entire cover I allowed it to dry and then randomly dressed the cover in Texture Crackle Paste. I love to use Crackle Paste and there is plenty of it here to see. I made sections thicker than other and gave it a textured element in place using my palette knife. I then let this sit overnight to dry and crackle.
[gallery grids="News" image_size="large" size="full" ids="1982,1981,1983"]
The next day I came back to start the process of selecting my Dusty Attic Chipboards...... the fun bit.
Well lets just say my art room was very clean before this step. I had chipboards everywhere and to decide what to use was no easy choice. Eventually I decided on just a few of my favourites. I dressed all of them in Crackle Paste (White) and then used my acrylics above to colour the chipboard pieces.
The chipboards I have used for this are:
[gallery grids="Featured" image_size="large" size="medium" tiles="true" ids="1993,1994,1995,1996,1997,1998"]
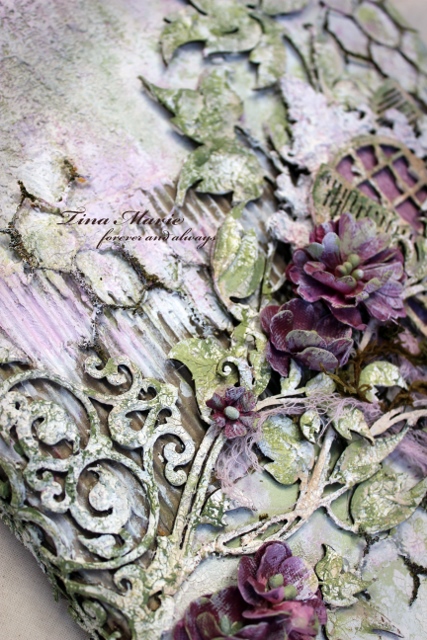
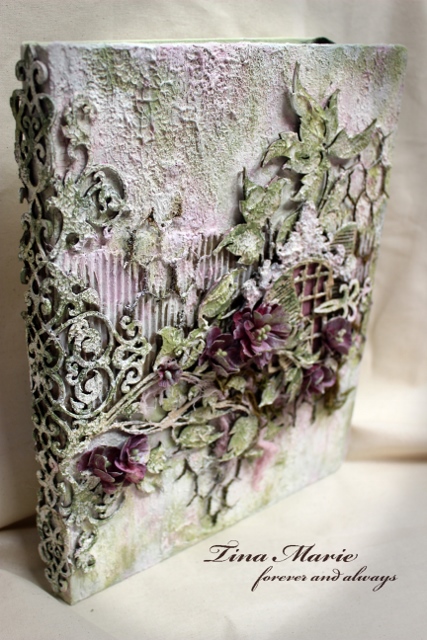
I ripped some Dusty Attic Corrugated Card and wrapped and adhered it around the cover. I did another layer of Crackle Paste in white and while it was still wet I pushed in some chicken wire that I picked up at the Dollar store. It is just awesome already rusted to go. I then layered my coloured pieces of Chipboards over the book cover. The Window and Shutters were layered a little differently. I like things to be a little more rustic so I gave it that kind of look. I also placed some Maja Designs paper behind the window to give more of a complimentary colour.

I also coloured my 49andMarket flowers with the Raisin Acrylic Paint.
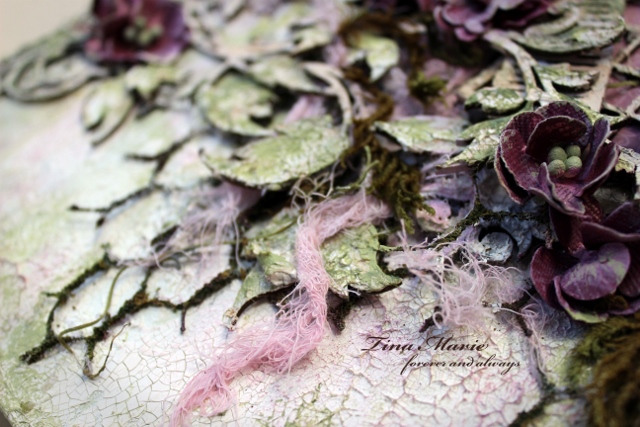
At the end I coloured some cheesecloth with the Sugar Plum Acrylic Paint and washed it down to get a pretty lightened colour. I added this amongst the chipboards and along with some moss from my stash. Above you can see the texture in the chipboards and on the cover.
And from a different view.
Well that is all from me today. I am so glad that you could join me here today. Thank you and until next time take care and happy crafting.
Teen x

Thursday 29 November 2018

So Beautiful - Mary Tzalla - Moodboard Inspiration


Hello Dusty Attic fans!

Today with you Mary, and I have a notebook to show you which is based on November's moodboard.


I got inspired by the flowers on the right top photo, the color tones and the vintage feeling of the board. 


To start I gave a coat of black gesso on the cover of the notebook and I used the Dusty Attic ''Damask #2 Stencil'' with graphite texture
paste to create texture. I added white crackle paste and when the crackles appeared I painted everything with a Finnabair Impasto Paint. Then I added color with the Lindy's spray.

  
Then, I heat embossed the window from the ''Window & Shutters #3'' with the Wow Platinum Sparkle embossing powder. The
chipboards from the ''Foliage #8'' and the ''Flower Buds #2'' were also embossed with the Wow Glamour Green powder and the buds were painted with the Finnabair Sparks Iris Potion acrylic paint.


The ''Page Pebbles #3'' chipboard was also painted with the Finnabair Sparks Iris Potion acrylic paint.


 When everything was glued down I added some glass glitter and beads.


Dusty Attic chipboards used:


Well my friends, that is
all from me today.
Thank you for stopping by!

Wednesday 28 November 2018

Merry Christmas - Tina Ollett

Hello and welcome Dusty friends.
Well I am sure that we are all feeling it ..... the festive season, it's already upon us. We here in Australia have been seeing it in the shops for the past month already. So I thought it only fitting also since I received two fabulous goodies boxes last week one from Miss Jennifer Hedger containing the most gorgeous of all chipboards ever the New Releases for October.
So here it is......

"Merry Christmas"


I have used this gorgeous photo of my two eldest from a Christmas a long time ago. These two have now graduated school and are out in the big old world doing their own things. So when I think of Christmas these days, I always seem to revert back to when the kids were much younger. Back when I use to dress them up and make them sit for an hour to get that one photo to put on the front of the yearly letter to all those that we would send out Christmas cards too. My poor kids. Well they survived all those Christmas photos, but lets just say these days it is a rare occasion to get a photo of them together at all on Christmas Day.
So about the layout. ........ My second goodies box that I received last week was the new release papers from 49andMarket and they were of course a Christmas collection. 
So that is where I started with the cutting and framing and layering of my new release 49andMarket papers. I then went on to do some stencilling. The background of these papers are just gorgeous but I thought it best to change up the snowflakes to stars since it is a very rare occurence that we would see snow here in sunny Queensland. I used some paper texture paste through the Dusty Attic Starry Night Stencil. This really has to be a favourite stencil. I have used it a number of times and it really is the perfect stencil to add softness to a layout.


I then went on to add the matting and photo which I decided to photoshop a little. The kids clothing was very very bright and I felt it didn't grab you when you looked at it. I then added in my flowers and dusted them a little with white gesso and some Star Dust Stickles to make them sparkle. I also added some of the Star Dust Stickles over the top of the textured stars when they were dried. I have also change the centres of the flowers with gold. You can see below.


I also used some of the Dusty Attic Rhinestones and changed them up a little as you can see above. I added them firstly to the layout then gave them a couple of coats of white gesso. Once dry I add some gold over the top. And then once that dried I added over some Star Dust Stickles to make them shine too.


The Cosmic Swirl that you see above was firstly dressed in white gesso. Once it was absolutely dried I swiped over the frame with a gold acrylic paint. Any unwanted areas I just wiped away. I did this a few times until I got the depth of the colour where I wanted it. Once this dried I then added in some Star Dust Stickles to make it shine once again.


The reindeer you can see above was primed with white gesso and coloured with gold Acrylic paint. I did swipe some white gesso back over it at the end as it was quite stark.


And this gorgeous Scroll Set I used to start and end the embellishment of my flowers. They are just gorgeous little adds to a Christmas layout I think. These I dressed in white acrylic and I added a very thick layer of Star Dust Stickles so they poppped. You can also see that I have added in a little lace just to soften the layout some more.


Well that is all from me today! I hope you have enjoyed my first festive layout. 
Until next time take care and happy scrapping.

Tina x


Tuesday 27 November 2018

Notebook November fun - Rosalie Duke-Stanley


I thought I would create a journal cover that highlighted the nature within the mood board for November. 


My Tree of Lights journal cover. I selected a journal that have a fabric cover for extra texture however any cover is fine to use. I clear gessoed the cover as the fabric needed to have a workable surface. Tip - put in a fairly generous layer, 2 if you need to, to make sure that fabric cover doesn't have any spaces where sprays and medium can soak through to the inside card. 

Once the gesso layer is dry, I used a light brown rust paste with the Dusty Attic burlap stencil. Don't worry if it comes out a little chunky as the texture adds to the look.

I used a variety of Lindy Stamp Gang (LSG) sprays to add some colour and take of the flatness of the dry rust paste. I used Canna Lily Burnt Orange ( a recent favourite of mine) and Steampunk Sepia (this colour is the one that I use the most and always have a spare one ready to go just in case). Tip - if it gets a too wet, dab with some hand towel to remove any puddles. 

I painted the Dusty Attic chipboard in a range of colours including Hot Chocolate, Forest, Pesto and a gold paint. For the border and tree, paint with Forest and then dab Pesto on it and spray with water to take the flatness of the colour. Tip - cut the crooked fence chipboard to size first so you can use the spare piece for another project. Light globes - cut the ones that you want to use of the frame first and again, put the reminder aside to use on another project. 

Start assembling by gluing the fence piece on. Use the square frame as a guide to where to glue it so that you end up with it sitting in position underneath. One the fence is glued on and dry, add some of the Canna Lily LSG spray by painting on so that the fence blends in with the background. Glue the Frame on next however leave some unglued spots on the inner edge so you can slip the light globes underneath. 

To finish of adding the embellishments, add the tree and glue the globes under the frame and tree branch. Add the grass pieces however you will need to have some sitting on top. Tip - when you add Art Stones (final step) this will help prop them up if you put some lightly under the chipboard. 
To add dimension, use a Finnabair wax paste on the frame to add a colour tone and  Tim Holtz Oxide Distress Ink in a green colour with your finger over the tree to add a grungy tone. I also added some Tim Hotlz Oxide Distress Ink in a  brown colour (watered down and added with my finger) on the grass chipboard pieces to add a differant colour tone. 

Final step, add some large Art Stones and glue in and around the grass chipboard and once dry, paint some LSG Steampunk Sepia to add colour and take off the 'whiteness' of the Art Stones. Tip - if you notice that the frame may not have glued onto the corners of the cover, add more glue and put a weight on the corners. the chipboard will bend slightly and adhere to the cover. 

Larger Journal Cover - you use this design for a larger rectangular journal cover by using a larger frame and one of the other bare tree chip boards. You can also add more globes to fill on the negative space around the tree. If you want the fabric look under the main feature, glue a piece of textured fabric to the journal cover and clear gesso as per my instructions.