Monday 29 February 2016

Dare to Fly - Rajni Chawla - Mood Board Inspiration

Hello all...


Rajni Chawla again on the Dusty Attic Board with another new inspiration for February month. Hope you all are enjoying playing along the challenge each month. February month was pretty hectic month for me and I was totally blank for my second inspiration. I was not able to think what exactly to make. I m not too much into making lauout pieces but always want to make something thats useful and inspirational. I started up making art journal cover but ended up with a decoration piece....this generally happens with me most of the time. Hope able to inspire u again with my new creation. 


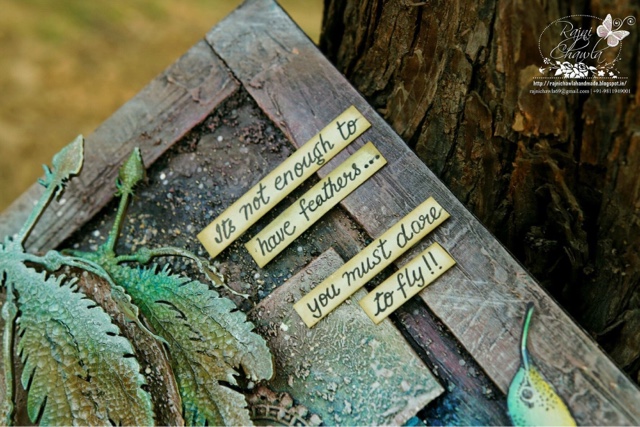
IT'S NOT ENOUGH TO HAVE FEATHERS....YOU MUST DARE TO FLY !!


What a beautifull quote came into my mind when I saw Dusty Attic Indian Arrow chipboard. I was attracted to the beautiful carved feathers. Nature has blessed the human with unimagined power: the will to conquer the universe, the desire to know, and the curiosity of the unknown. The word impossible does not match with human nature. we have enough courage to face even our greatest fear....but only if we 
wish !!

Here is the February mood board. 


I worked with shades of blues n browns and mixed them with tones of greens to create something that can inspire me always and can match the above quote.

Feathers ,Flowers....more Flowers....and Birds !!


The blues depict the shades of sky and deep ocean, Shades of greens depict the green nature and browns depict our mother Earth. 
Here is what I came up with. 


I started a coat of gesso, then textures using DA Texture paste....lots of mixing and building layers with leftover chipboard negatives. Yes....you heard it right. I have built  most of all the layers using my leftover negative pieces of chipboard that I used in my prior projects. 
Look at those small square and oval pieces....Do they look like they were waste pieces??
Actually No!!
Once textured,layered and colored they are no more waste for me. 
I try to take out maximum of what I have in my stash. Little hand fisted person I am.


I took Dusty Attic Indian Arrow charm as my main focal image for the concept. These are painted with Dusty in color, Gingernut, Dusty in Color Oceania, Dusty in color Crushed Olive and when dried painted with Dusty in color Clear Crackle medium. Little highlighting with Dusty in color Navajo White was enough to add more beauty on it. 


I have used Dusty in blooms and few bunches of Prima twigs and few flower metal charms to add  more of spring look. I have also used Dusty Attic Geometric Corners here and there. 

Another view....


Another close-up of Dusty Attic Indian Arrow. 


Few more angles showing different layers and texture. 

Can you see the negative of Dusty Attic Geometric Corners hiding behind Dusty in blooms and metal flowers. 


The chipboard piece on the edge again is the negarive of Dusty Attic Geometric Borders. 
And here is my handwritten message....yes, my son preferred and asked me to put hand written message on my project. I know my writing is not that good but not very bad too. 
 I used Black Archival 0.3 pen to write the message. 


Here is the complete list of all the Dusty Attic products I have used together. I have already linked all the products on the Dusty Attic website.


Sunday 28 February 2016

On the Sculpture trail - Heather McMahon (with a mini tutorial)

Hello there! It's Heather McMahon here today with a step by step process showing how to alter your chippies to make them look like wood, plus I've been playing with the new Colour Blast products that are now being distributed by The Dusty Attic.

Here's my layout:


Yes! I used purple! We received some fabulous Colour Blast products to try and I received some purple spray. More on this later in the post.

I really wanted to make my chippies look like the wood used in the sculptures. You might be able to see here in the close ups how the chippies reflect the same variation in colour that the sculptures do. They are not just all the same brown. (The first photo looks like it has a crackle effect but it's just the light playing tricks.)


Here's how I treated the chippies. Note that this demo piece is a much smaller version of the scroll that I used in my layout.

Step 1

Randomly apply gesso to about three-quarters of the surface of the chippie. Just use your finger - variation in texture is good!

Step 2

Stamp Timber Brown StazOn ink heavily over about half to three-quarters of the chippie.

Step 3

Apply Vintage Photo Distress Ink over the whole surface.

Step 4

Now here's my secret weapon - while the Distress Ink is still wet, coat with Dusty Attic's Clear Gloss Varnish. As you apply the Varnish, the wet ink will bleed and give a beautiful mottled appearance. Leave to dry for at least a couple of hours.

I also used Clear Gloss Varnish to coat my title. I use this product for everything! You can find it here.

To create my background, I used ink through a Dusty Attic script stencil. For some reason, this stencil just seems to work with any type of layout! I then sprayed Colour Blast spray over the areas behind my photos and journalling. This spray is really light - perfect for when you just want a subtle touch of colour.

I spread Colour Blast Colour Paste through the Dusty Attic butterfly stencil. The Colour Paste adds an incredible shimmer! It comes in a gorgeous array of colours too. You can find the Colour Blast products here.


The Dusty Attic products I used are:
Scroll #8 DA0626


Typewriter ABC Set DA0143

Creative Script Stencil DA1494

Stencil Butterflight DA1493

Dusty In Bloom Bridal Veil DA0805

Dusty in Colour Clear Gloss varnish DA 0901

The Colour Blast products I used are:
 Colour Paste in 'Apple of my Eye' 
Colour Spray in 'Lovely Lilac'
 
 
Happy scrappin'!
Heather McMahon


Saturday 27 February 2016

Big Memories - Lisa Gregory - Hand Made Journal - Mood Board Inspiration

Hello Dusty Attic Lovers. Today I bring to you a 5 x 7 mini album that I created. A special mini to place all of those special photos. I created the album using chip board, and I covered it with Dusty Attic Corrugated Card. I love the texture of corrugated cardboard. I painted the cardboard using Mountain Meadow and Pesto Dusty Attic Acrylic paints. To add richness to the colors, I sprayed it with gold mist spray. I love that the Mood Board took me to a different place when choosing my colors. I chose one of the photos on the board that had green in it. Dusty Attic had the perfect colors to create what I envisioned. But that's what an inspiration board does right?? Inspires you to be at your creative best!!


 This is a view of the spine. I had a wonderful idea to use a lot of the mini pieces of chipboard. I sprayed them with gold spray, added a jump ring to each one, attached the jump rings to a chain and created a dangle for my mini.  I also sprayed some seam ribbon and tied it to the top of the mini.

  
Here is a close up of the dangle. I added some rhinestones to some of the pieces for added sparkle.

This is a closeup view of the mini chipboard pieces.  After I sprayed them with gold mist, I wiped away a bit of the spray to give it a worn look.


The mini album is small, but it can still hold up to 4x6 inch photos. It is a chunky mini with 4 inside pocket pages.


Each page holds a pull out page that can hold more photos. You can also add tags to the pockets, or just slide photos into each pocket.


Here is a view of the pull out pocket. I punched the edge with a decorative punch.


This is a view of the back of the album.


This is a close up of the corner of the album. Before I place the flowers on the album. I sprayed the whole album with gold mist. I love how it settled in the crevices of the corrugated card. I added some of the rhinestones to the flourishes.


I sprayed the chipboard with gold spray, then placed some rhinestones on it for extra sparkle.


Thank you for joining me today!! I hope that you are inspired to jump start your creative side using the Inspiration Board!! I know I was!

Dusty Attic Product List:


 X's an O's
Lisa