Thursday, 21 February 2013

"Dusty Organizer" by Natasha Naranjo Aguirre DT

Hi everyone!  This is a Dusty Organizer that I made using the Dusty Attic Advent Calendar.  I thought these drawers would be perfect for holding little bits.  
I used the Et Cetera paper collection by Bo Bunny to cover the sides of the box and the drawers.
I covered the surfaces of the opening of the box with White Opaque Flakes by Liquitex and then inked the area with Smooch Spritz and Mix'd Media Inx.  The corrugated board in the background, as well as all the other chipboard elements, are made by The Dusty Attic.
This beautiful French Garden Border was inked and then adhered using Helmar Zap Dots to add depth and dimension.
Bitty Blossoms galore!  Yes I made ALL of these Bitty Blossoms by hand.  I wanted to have flowers cascading down one side of the organizer.
I randomly added buttons to some of the drawers and a cute cord bow to finish off my organizer.  I can't wait to fill this up with yummy stuff!
Much love & hugs,
Dusty Products Used:
Advent Calendar DA0201
Vine Corner DA0753
French Garden Border DA0845
Typewriter Font ABC Set DA0143
Moments of Tranquility

Wednesday, 20 February 2013

'Shine' Layout by Mistra Hoolahan DT


Hi everyone!  Today I have a layout to share with you about my One Little Word for this year - SHINE.  It's more about finding sun-shine in my heart and life than "shining" creatively, but it doesn't hurt to add a bit of shine everywhere in my world LOL!

I found this fabulous paper in my stash with a Sunflower on it, I must have grabbed it ages ago because I don't recall buying it!  But the universe must have been speaking to me even then, because the sunflowers are my "shine" flowers!  


What would be more perfect than to use Dusty's Sunflower Vine chippy!!   I have entiwined it with the Leafy flourish to extend the sunflower and add some dimension.

They were both painted with Pesto Dusty in Colour Acrylic Paint and the sunflowers painted with Sunshine Dusty in Colour.  I then added some more Pesto from the centres to mimic the flower on the patterned paper.

The fine butterfly shown above was a brass charm, which I painted with Bisque Dusty in Colour Acrylic Paint, and then some metallic leaf added to give it shine.


I made some flowers with Spellbinders Rose Creations Die, with just white card stock so I could match the sunflowers.  They were sprayed with an ink mist and painted with ink also.

The Typewriter Font alphas were painted white and then inked with Vintage Mix'd Media Inx.  I added some metallic leaf {for extra shine} and then added a coat of Dusty's Clear Gloss Varnish. 


The little resin flower was originally white, it was painted with Vintage, Mossy and Truffle Mix'd Media Inx.


I made a ruffle with some paper offcuts and trimmed it with some hessian trim I recycled from a card.  The cute little button I poured from white resin using a mould from Moulds by Mel... so so cute!  It was painted with Pesto and Bisque Dusty in Colour, with metallic leaf added, and as a finishing touch a pearl added in the centre.


Thanks for stopping by today!

www.mistrabutterfly.blogspot.com

Products Used:

Dusty Attic Chipboard:

Dusty in Colour:
Acrylic Paint - Pesto, Sunshine, Bisque

Tuesday, 19 February 2013

"February ATC" - Love - Mistra


February is the month of Lovin'... especially at Dusty Attic with our "Love" theme for February's ATC challenge!   This is my ATC... I've used some corrugated card for the back, and layered with some mini Chicken Wire, ATC Frame, mini Scrolls and sweet little love hearts.

I like to add tags to the back of my ATC's so I can hang them about my scrap room instead of putting them away in a folder... they all look so pretty!!


All the chipboard was painted white with Dusty in Colour Alabaster paint. The edges of the ATC Frame were then touched with Schoolhouse Mix'd Media Inx, and one heart was inked with solid colour.  The last heart was inked with Chiffon Mix'd Media Inx and then covered with Fairy Dust Glitter.

I hope you all have a lovely Valentine's Day and spend some time with someone who means the world to you, I know that I will be!


Products Used:

Dusty Attic Chipboard:

Dusty in Colour:
Acrylic Paint - Alabaster

Accessories:

"February ATC's" Geraladine

Hi there everyone, it's my turn again on the blog today and I'm here to share my February 'Love' ATC.
I wanted to do a different take on the 'Romance and Love' theme and as I watched the Wizard of Oz last week with my children I kept thinking of the Tin Man and the Lion....Yep! I muddled the two up a little and came up with my ATC.

Lighthearted!
Dusty Attic Products:

Coat of arms add on #2
Fancy Labels
Other Products ~ Tim Holtz Crackle paint, Distress inks and Distress markers, Pink Paislee Paper and Prima trinket.
This Atc is a matching partner to my January ATC here on the blog in a previous post.
Thanks for coming by the blog....do stay a while and look at all the wonderful creations that the Dt have made, I'm sure you will find some inspiration. Till Next time, G!

Saturday, 16 February 2013

'My Girl' Layout + Tutorial - Louise Collins DT

Today I would like to share with you a couple of layouts and show you how I have created my backgrounds using Dusty Attic Paints.
 
My first layout is this one that I created on a sheet of Chipboard...
 
 
Firstly, I 'dolloped' some blobs of paint in the region that I wanted my background colour.

 
Then I laid a small plastic bag (I used a peddle bin liner) over the paint while it is still wet.
Use your fingers to spread the paint around under the bag.
*HINT*
If you can find a clear bag to use, you can see where you are spreading the paint.
 
 
Lift up the plastic and voila! You can lay the paint covered plastic back down in a different position to spread the paint further.

 
After doing this and allowing it to dry, you can repeat with other colours as I did with the yellow paint...


And on to my second technique. Here is a layout that recently appeared in the Dusty Attic Gallery
 
 
When I first used Dusty Attic Paint, I was thrilled by how thick it was, perfect for covering that chipboard with. However, sometimes I want to be able to allow my paint to run and splat, which is where I need it to be a little thinner.
 
To do this, I mixed a little water to the paint...
 
When it was thoroughly mixed, I used a plastic dropper to drip the colour down my page.
Before doing this I had glued some glass microbeads to my page to act as a mesh that slowed the paint down and allowed it to spread rather than simply run straight down the page.

 
Once I had dripped and dried my first, lighter colour, I then added a darker shade to the remaining watered down paint and mixed it well again.
 
 
I then repeated the dripping again as before.

 
...and there is my coloured background, ready to embellish!
 You can view and order DA paints from the website here
 
Other Dusty Attic products used on these pages...
Butterflies #2 DA0842
Floral Corners DA0848
Moroccan Accents DA0837
Vintage Keys DA0392
 
Lou Collins XX My Blog: http://prettypaperandchipboard.blogspot.com


Friday, 15 February 2013

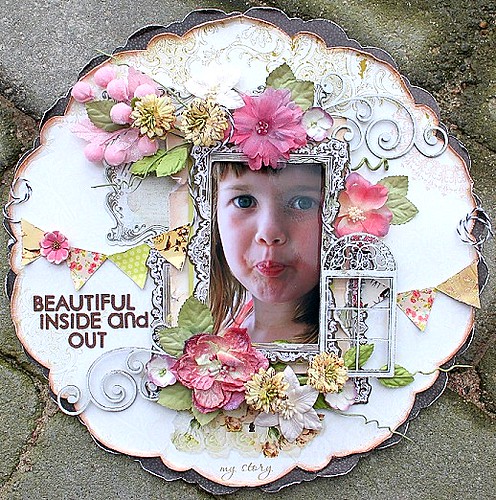
'Beautiful Inside and Out' Layout by Helena Johansson DT

Beautiful inside and out

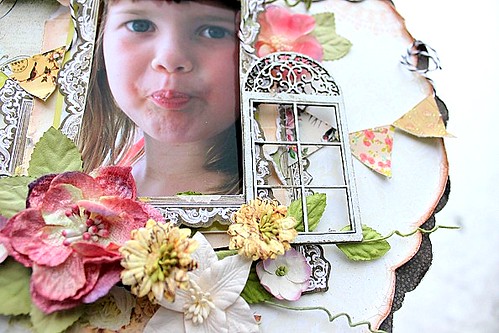
My little girl really is beautiful inside and out. For this layout I have used a Scroll Border #3 (DA0761) and a Mini Arch Window (DA0818). I divided the Scroll Border into two pieces and then painted all my chippies with Dusty in Color, Alabaster (DA0902). Then I used my distressing tool to give the chippies a rougher look.

Beautiful detalj4

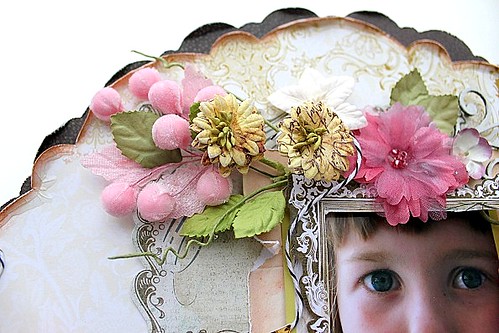
I have used Clear Crackle Varnish (DA0900) around the edges of the white patterned paper, after I chalked the edges with a dark brown fluid chalk, this gives such a fab look!

Beautiful detalj3

Among the flowers you can spot Dusty in Bloom Evening Blush (DA0808) and Leaves (DA0810).

Beautiful detalj2

These little windows are so cute and easy to use on any project - layouts, cards, ATC's - one of my new fav Dusty Attic chippies!

Beautiful detalj

Thank you for stopping by today!

See you soon.

Helena


Thursday, 14 February 2013

"Magic Happens Shadow Box" & Tutorial by Belinda Spencer DT

Hi all!!

This month at The Dusty Attic I have an Off The Page project with tutorial to share!!

I loved the ATC Shadow Box as soon as I saw it and as we will soon be renovating the kids' bedroom, it was the perfect opportunity to create something pretty for my daughter's new room.

Here is the finished project...


I have used lots of whimsical little creatures and fairies from the Graphic 45 Once Upon A Springtime range.

Here is my tutorial on how I created this project...

STEP 1:

- Before I even get started creating, I like to have a bit of a trial run at folding my Shadow Box. This ensures that all the sections are pre-folded and I know exactly where everything is going and where to put the glue.


STEP 2:

- Fold and glue all sections of your Shadow Box into place.
- Hold together with our hands until the glue dries a little and it will hold in place.
- Then secure with elastic bands (or hairties as I have done!), until it is completely dry.
- Don't worry if the sides get a little grubby with the glue as it will all be covered up later.
- While it is drying, you can gather all of your supplies.


STEP 3:

- Paint the whole Shadow Box with a base coat of white gesso. I gave mine two coats.
- Set aside to dry.


- Add some bricks from the Brick Wall Panel to the front using a strong glue such as Helmar 450.
- Cut a piece of Chicken Wire Panel to fit the centre of the Shadow Box and glue in place.


- Use a sponge to dab gesso over the top of the chipboard pieces.


- Allow to dry and then sand the edges to create an aged, distressed look.


STEP 4:

- Take your various chipboard pieces and sponge on some white gesso. It doesn't have to completely cover the chipboard. A patchy look adds more interest.


- Next choose some colours from the gorgeous Dusty In Colour range of Acrylic Paints and lightly sponge those over the top.


- Once the paint is dry, spray over some Dazzling Diamonds Glimmermist for a little shimmer.

STEP 5:

- Now it is a matter of layering all of your chipboard elements and fussy cut pieces.
- The trick is to start in the centre of the Shadow Box and build up your layers from there..


- You can use varying thicknesses of 3D Foam or Magic Mount to help you create a really 3D effect.


I hope you have enjoyed my tutorial and I have given you some inspiration to create your own ATC Shadow Box.

Dusty Attic Products used:


CHIPBOARD:

My next mission is to create a boy themed one for my son's bedroom!!

What have you got planned for yours?


Happy scrappin'
B-) xo